
CoreXY 3D Printer
Tier 1 project (10 points)
Written by: Anicetus
Hello! When it comes to 3D printers, CoreXY's are the best. They're the most high-quality and fast, but tend to be much more expensive and complicated than a Cartesian 3D printer.
But first, here's an overview about the differences between Cartesian and CoreXY 3D printers, and how they work.
Safety
3D printers are fire hazards. Their hotends heat very hot, and the beds heat hot on a large surface area. They use a lot of power. Here are mandatory things you must do to ensure that you don't ruin the printer, injure yourself, or start a fire. You may balk at these requirements, and how strict and unnecessary they may be. But as the saying goes, better safe than sorry.
1. Always buy your power supply from a trusted brand. Never ever buy from a no-name or knockoff brand. Mean Well is the best brand on the market and are widely used for their safety and quality.
2. Never solder AC wire connections. Use spade disconnect connectors for your power inlet and spade terminals for your PSU. More about this later.
3. Never tin (add a shell of solder around) your wires. Tinning wires is illegal in all of the UK, most of Europe, Australia, New Zealand, and South Africa because it starts fires. Due to a process called creep, the solder deforms and wires can come loose and start electrical fires. Instead, you must use ferrules or even just twist the wire before putting it in.
4. Never modify the PSU. There are capacitors inside that carry enough voltage to kill you. This is not a joke. Never open it unless you know exactly where not to touch it and are wearing electrical gloves.
5. Quadruple-check all wire connections and make sure everything is tight, and re-tighten every day for the next two weeks of operation.
6. Never leave the 3D printer unattended for long periods of time. The truth is, this is a DIY 3D printer cobbled together by (likely) an amateur. Things can go wrong that you would never expect, and if you don't catch it, you could pay severely.
7. Use the right size wires. If you use a gauge of wire too low to power your PSU or mainboard, it could start a fire. 12 to 16 AWG (3mm2 to 1.5mm2) is great for your 3D printer. Anything smaller than 18 AWG (~0.8mm2) is likely not to work.
About CoreXY's
A good example of a CoreXY printer is the Bambu Lab X1 series. They look like big cubes, and the Bambu line has an enclosure around the entire thing. A Cartesian printer is like an Ender 3 or a Bambu Lab A1 Mini. Cartesian printers come in two main types: bedslingers and cantilevers. An Ender 3 is a bedslinger (named because it slings the bed back and forth) and a Bambu Lab A1 Mini is a cantilever (because there is only one pole
supporting the arm
.)

But back to CoreXY's. Here are the pros and cons as compared to a bedslinger or cantilever printer:
Pros
- Very fast: The average CoreXY can print at least twice as fast as the average bedslinger. This is because of the two following:
- Printhead X/Y movement: Only the printhead moves sideways and forwards, instead of the entire bed, and
- Dual X/Y motors: Two motors drive the printhead, collaborating and reducing strain on each. This also improves accuracy.
- Bigger: CoreXY's can be built bigger than Cartesians while preserving the same quality (again, due to the bed not moving nearly as much)
- Enclosable: Cartesians require much more space than CoreXY's because of the bed that moves back and forth. The size of the CoreXY doesn't depend on the bed position. ### Cons
- Complicated: CoreXY's require many times the amount of components that Cartesians do, making them more complex to assemble and maintain, let alone design.
- Long belt paths: Tensioning CoreXY belts can be difficult, and routing them in your design can be incredibly hard.
- Expensive: More components mean more price, and since the frame of a CoreXY is a cube instead of just an upside-down T, the frame is much larger.
A CoreXY is no task for the weak of spirit. It will require perseverance, focus, and vigilance. It's going to be hard sometimes, and you're going to want to quit. But if you stay strong and power through it, you'll be well rewarded. It's gonna take the entire $350, and likely more out of pocket, but you'll be left with your own 3D printer. You'll be able to tell people, I made this!
Besides that, it might get you into MIT :3
But, without further ado, here's how to design your own CoreXY.
(Note: This guide will not be a step-by-step building your own 3D printer, but simply some tips and tricks I learned making my own.
Step One: Research
Researching parts is at least the second hardest part of making a CoreXY--or any 3D printer for that matter--but very, very important. It took me literally ages to get the fine BOM I have now--at some point I swear I had a hundred AliExpress tabs open--but it's worth it to get the most out of your printer. First, I'd recommend you choose what kind of specs you want. Speed, size, enclosure, multi-filament system, etc. If you plan to make some sort of cool gimmick, like an enclosure or a toolhead changer, be prepared to spend a bunch of money out of pocket. As it stands, it'll be difficult enough to make it without any special stuff.
For the sake of the guide, I'm going to be assuming you're using Klipper firmware like me, and that you already own an external host (i.e. Raspberry Pi.) If you aren't using Klipper, note that you can't use the Klicky probe as mentioned later in the guide. If you want to use Klipper but don't have a host, I'd recommend the Raspberry Pi Zero 2 W for running a single printer. If you're going to run more printers on it later, go with the Pi 4 or 5. However, I'm currently using a rpi 3b for both, and it seems to be ok!
Also, note that speed and size are mortal enemies; it's quite difficult to put both in the same machine. For a budget build with the $350 provided by Hack Club, I'd only do one. If you want fast, like 350mm/s or above, I'd recommend a 180x180mm plate. For incredibly fast printing, i.e. 500mm/s or even more, even as small as a 120mm printer would be beneficial. If you couldn't care less about speed but want it to be big enough to make, say, 7" drones, you could make it 400x400mm build size (or bigger!) and only print at around ~100mm/s.
The main reason that speed and size are so exclusive is stability. If you have a printhead moving the length of a 500x500mm build plate in one second, multiple times in a row, it's going to rattle like crazy. To counter this, you'd need wider aluminum extrusions, making it even more expensive than it was already. This is why my printer uses 3030 extrusions, instead of the most common 2020's. It makes it so much bulkier and firmer. A smaller printer has less length for the extrusions to twist or bend, and is thus more stable. For future reference, when I say stability I don't mean how much the printer shakes or rattles, but how well it keeps its shape.
AliExpress is your friend when researching parts, (sorry Indian people!) and it has plenty of good products. Just make sure (and this is good advice for any project) to always sort by order count. You do not want to be the first--or seventh--order of a product. And if it's possible, always try to order from a well-aged seller, ideally pre-Covid. The best seller for hotends and extruders is Triangle-Lab, (sometimes called trianglelabs) and here's their official store on AliExpress, open since 2015. As far as I know, there aren't any name-brand aluminum extrusions or linear rails, but again just try to find well-rated ones (be sure to check for fake reviews) with many orders. I'd advise against Dollar Express, as the number of orders can be very misleading.
One strategy you might try is buying broken 3D printers off of eBay. I know a guy who bought two ender 3's and cobbled them together to make a beautiful dual-gantry printer. People tend to sell broken printers cheap, and you can get an easy heated bed, aluminum extrusions, and more out of it. However, if you choose to do it like this, you'll have to center your design around the parts you'll be getting from the seller. For example, the aluminum extrusions in your design will have to be the ones that the broken 3D printer uses. Sometimes this can be a problem, especially since most 3D printers for parts out there are bedslingers with all sorts of different lengths.
Here's a very simple BOM and explanation to get you on your feet:
(Please take this with a giant grain of salt. You'll need to do massive amounts of research for what you have in mind, and I'm 99% sure you won't be using every part I recommend.)
Printhead
| Part | Cost | Notes |
|---|---|---|
| Hotend | $20 | An E3D V6 clone is good for non-high-speed printing, otherwise check out the TZ E6/V6 |
| Extruder | $40 | The Orbiter v2 is very good, also the Sherpa Mini |
| Part cooling fans | $10 | Please get two 5015's. I'm begging you. |
| Heat sink fan | $3 | 3010 is good for basically everything. If you plan to print super fast maybe 4010. |
| Z-Probe | $7-$37 | For seven bucks, the PCB Klicky probe is super. For higher quality, check out the BLTouch. Never ever buy a 3DTouch,it's a scam. |
| PTFE Tubing | $5 | To route filament to your printhead. Two meters is plenty (with extra in case you mess up) |
| ADXL345 | $3 | An accelerometer for input shaping |
| Printhead Lights (optional) | $5 | There are PCB kits out there, or you can just use some white LEDs and resistors |
| Wire routing | $5 | Printhead wires can get quite unruly. Routing can be just zip ties or a dedicated chain like Vorons have. |
| Total | $93-123 |
I personally love the Klicky probe. The way it works is it's a tiny micro switch with a dock at the back of the printer. The printhead moves back to the dock and picks it up with magnets, which also convey the voltage + and - (for an LED) and signal for button presses. The micro switch sticks out from the printhead and acts as a Z-probe and as the Z-limit switch. The printhead then docks the Klicky, so that the nozzle isn't blocked anymore, and goes on to printing. It's only 7 bucks as compared to the BLTouch's $30-$40 price mark, making it pretty great for its price. I was able to mount it quite discreetly on the printhead and made a cute lil dock for it at the back of the printer.
The reason a lot of people choose BLTouch instead is that it's plug and play with most mainboards, unlike the Klicky which needs some fancy wiring, and instead of having to dock it, you just fasten it to the printhead and it automatically pushes out a little probing stick every time you need to probe. It's very very handy, but beware: knockoffs abound. If you get a BLTouch, you must get one that says BLTouch
on the side. Not 3DTouch,
BLTouch
!! People have done tests, and 3DTouches are the least accurate, most worthless probes you can buy. The list of authorized sellers and legitimate BLTouches is at their website, https://antclabs.com/. I almost fell for a 3DTouch, and it cost me a lot of design work when I realized they were so bad. Proof:
In my own CoreXY design, I failed to put two 5015 blower fans for the part cooling. This rookie mistake is costing me now, due to a lack of cooling with dual 4010 blowers. I'll still be able to print PETG well, but PLA may suffer. Dual 5015s are more than enough for any printer.
The hotend is a crucial component, and you should dedicate much time to researching one. One of the most common is an E3D V6 clone (the original is too expensive and the clones are just as good), which is capable of a flow rate of up to 15mm3/s. This equates to approximately 180mm/s printing speed with 0.4mm width and 0.2mm layer height, or 120mm/s with 0.6mm line width and 0.2mm layer height.
Tip:
Print speed = (flow rate ÷ line width) ÷ layer height
e.g. (15 ÷ 0.4) ÷ 0.2 ≈ 180
or (15 ÷ 0.6) ÷ 0.3 ≈ 125
This is decent, but not very fast. If this speed is OK with you, go ahead! The E3D V6 is a favorite among many, and you'll be in good company.
But I know one thing for sure: it wasn't fast enough for me.
I used the TZ E3 2.0, a great (and very small!) hotend that the manufacturers claim can achieve 33mm3/s, meaning it likely gets around 30 with high-flow filament and a good extruder. Using the formula above, that equates to 375mm/s with 0.4 line width and 0.2 height. That's definitely better! The TZ E3 2.0's brother, the TZ V6 2.0, has the same specs but boasts faster cooling with a cylindrical heatsink instead of the E3's rectangular one. Additionally, the TZ line can all get up to 300°C. This is great for PLA, PETG, TPU, and others. I have no knowledge about higher-temp hotends. The ones on AliExpress have 40W heaters, so not very fast, but still pretty good.
Originally, I was actually planning to use a $90 Phaetus Rapido hotend, rated up to 75mm3/s. This was really really overkill, and I'm glad I didn't follow through with it. However, my next choice might have been worse. I looked around and found the Phaetus Dragonfly BMS, which ChatGPT (💀) said was a high-flow hotend capable of 30mm3/s. False. Here's a tip for you: never trust ChatGPT alone. The Dragonfly only got like 15mm3/s. But by this point, I'd already centered the entire design around it! I had to redesign a ton of the printhead to compensate for trusting ChatGPT. ChatGPT is probably the least reliable, most prone to error AI out there. It consistently gets technical information wrong, and it should never be used for important stuff. I actually found https://perplexity.ai, which uses a butt ton of sources to make sure that the info it gives you is always at least 51% correct.
Extruders, while a fundamental part of any printer, aren't quite as nitpicky. The Orbiter line is quite good from what I've seen, with their most recent being the Orbiter v2.5. In my opinion, v2.0 is plenty good enough for any scenario, and v1.5 should work well for slower printers. Many people feel, however, that the Orbiters are overpriced. The v2.0 I bought for my printer cost $40 and some change, which might be hard on a tight budget. In that case, you might check out the Sherpa Mini, beloved by many. To be clear, I haven't done very much research on the Sherpa line, so exactly what it can do is outside my scope.
The ADXL345 is an accelerometer, which just means it tells you how fast you're going in all three directions. It's used for input shaping, a complicated and interesting process that is explained very well here. I mounted mine butt-awful on the front of the printhead, but it should work lol
Printhead lights, while totally optional, can help illuminate your prints, whether for timelapses or simply for checking on prints. Vorons use these, in the form of small PCBs mounted at an angle to the hotend. Alternatively, you can simply wire small LED bulbs and add resistors so that you can wire them directly to your 24V output.
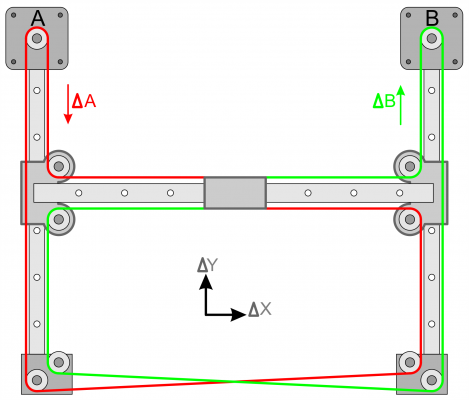
Gantry and Kinematics
Keep in mind that the gantry can be very different across printers. The Voron 2.4, for example, uses a gantry with an open front, and an intriguing belt path. The way you route your belts is totally up to you! This BOM goes over the parts I used in mine, which follows this diagram more or less.
| Part | Cost | Notes |
|---|---|---|
| Toothed Idlers (6 pcs) | $5 | The teeth help route the toothed side of the belts |
| Smooth Idlers (2 pcs) | $3 | To route the smooth side of the belt |
| Dowel pins (8 pcs) | $5 | To hold the idlers in place--don't 3D print these |
| 2GT Belt | $30 | Check the length needed after your design is done. |
| Linear rails/rods | $30-$60 | More on these down below |
| Pulleys | $5 | These attach to your motors to pull the belts |
| X/Y Motors | $25 | Motors are a very tough part to research. More below. |
| Motor Bearings | $5 | 608zz bearings are good for shearing motors |
| Total | $118 - 165 |
All of your idlers and pulleys should be 20T, except for the pulleys used in a belt drive Z system (one motor, three screws,) which, if you should choose it, should be 40T. (The T just means how many teeth it has; the most common are 16T and 20T. 20T are better for gripping the belts.)
I used dowel pins to hold the idlers, instead of 3D printing a peg that they slide on. The pins were about 3mm longer than my 10mm idlers on each side, and I made little wells for them to pop into. This disperses the stress from the belts across the entire holder, instead of just the peg.
The belt should be either a genuine Gates brand belt or a POWGE brand belt from AliExpress. I got POWGE, and they make pretty good-quality stuff. 6mm is fine for most builds, but if you're going to go fast (300mm/s or more I'd say) you might want to look at 9mm belts. I went 9mm just cuz, and it's working out well. The idlers and pulleys should be 7mm or 10mm wide respectively.
Linear rails vs rods are a tough one. Rails can get very expensive, but they're very smooth and make zero noise. In hindsight, I could have done rods to make my printer more budget, but rails are realllly satisfying. If you go rods, use 8mm diameter and LM8UU bearings. They're what everybody uses. If you're over budget, you can try buying or 3D printing bushings. Bushings are like bearings, but instead of little balls inside them, they simply have minimal surface area on the rod. They'll wear down faster but are good if you're just substituting until you can afford actual bearings.
Motors are a very hard thing to research, namely for a faster printer. I literally researched for hours and hours, trying to find the perfect ones. I finally found ones I liked, bought them, and checked out the lil specs card it came with. Alas! The AliExpress seller promised 2.7mH inductance when they were really 3mH inductance. Long story short, that means I can't print as fast as I would've liked. So I guess that's a mini lesson: never just trust the aliexpress seller. Anyways, everybody uses Nema17s, and will thus be the easiest to incorporate into your design. I wish I'd had this link when I was researching my motors. It lays out a select few with good specs. If you're printing slower (100-200mm/s) you hardly need to research them at all; any inductance of 4mH or under is fine, and you should have about 44+ Ncm holding torque.
From what I've learned researching stuff, for a 300mm/s printer, an inductance of 2-3mH is better, and a holding torque of 44 or more is still good. Then we get into high-speed CoreXY's. A 400-500mm/s printer should have 55 or more holding torque and max 2.5mH inductance. For incredible speeds like 600mm/s or more, you'll need 60-ish holding torque and very low inductance, like less than 1.5mH. It's in the high-speed world that you'll want higher-voltage stepper motors. Especially when going high accelerations, like 40k or more, 48V or even 60V can be huge. For this, you'll probably need another PSU to power the 60V, as well as a mainboard that has a dedicated motor input for those high voltages. However, it is still possible to run it at 24V. This video is worth a watch.
TL;DR: Printing over ~450mm/s is likely to set you ~$120 back in budget.
Last thing: if opting for high speeds that require a lot of torque, you may want to do what's called shearing
your motors. This just means placing a bearing at the end of the shaft, after the pulley, and connecting it well to the motor. The reason for this is that, with the high tension of the belts, the motor shaft may bend and damage the inside of the motor. Putting a bearing at the end and mounting it ensures that the shaft remains upright. When I tried this, I had a lot of issues with the motor not turning properly, so I simply removed it. So far, I've been having success without shearing motors, but it's worth a try.
Z-Axis
If you're doing a three motor three screw setup, it might look like this: | Part | Cost | Notes | |---------------------|----------|---------------------------------------------------------------| | Z-Motors | $28 | These motors don't need to be very powerful | | Lead screws (3 pcs) | $20 | T8, 4mm or 2mm pitch | | Linear rods | $15 | 8 or 16mm diameter | | Linear bearings | $10 | Really any 8mm bearings. Some have screw-hole flanges as well | | Flexible couplers | $7 | 5mm to 8mm diameter, for connecting motors to screws | | Total | ~$80 | |
Z-motors for a triple Z motor setup don't need to be very powerful, as all three are helping. As long as they have enough holding torque to prevent the bed from falling and enough moving torque to lift it up at a decent pace, you should be good! Keep in mind that you may need either a stepper motor splitter or a mainboard with three synced Z-axis motor outputs, which many do not offer.
Lead screws should always be 8mm in diameter. A smaller pitch means more precise but slower, and 4mm is a great middle ground. I used 2mm pitch (mistake) and it takes forever to move the bed!
There are two types of flexible couplers for the Z-axis: beam couplings (they look a little like springs) and jaw couplings (they usually have little orange flexible pieces inside). When searching for them, just search flexible coupler [or coupling]
and both types should appear.
For a one-motor, three-screw setup, your BOM might look like this instead: | Part | Cost | Notes | |-----------------------|----------|----------------------------------------------------------------------| | Z-Motor | $20 | This motor should be more powerful to be able to move the entire bed | | Lead screws (3 pcs) | $20 | T8, 4mm or 2mm pitch | | Linear rods | $15 | 8 or 16mm diameter | | Linear bearings | $10 | Really any 8mm bearings. Some have screw-hole flanges as well | | 5mm Inner Dia. Pulley | $5 | To put on the motor to drive the belt. Should get 40T | | 8mm Inner Dia. Pulley | $10 | Need three, one for each screw. Should also be 40T | | Total | ~$80 | |
If both come out at the same price, I'd go with three motors and three screws. Far more reliable, and easier to design.
Here's my belted Z-axis (two screw, not 3) if it gives you an idea of how it works:
Electronics
| Part | Cost | Notes |
|---|---|---|
| PSU | $50 | 450+W should be enough in most cases--get 24V |
| Mainboard | $30 | For an ordinary printer, the BigTreeTech SKR Mini E3 V3 is great! |
| Mainboard Fan | $3 | You don't need to be picky here, anything 4010+ axial is good |
| Heated Bed | $20-40 | Build size heavily influences price |
| Build plate | $20 | Most commonly used is textured PEI. Glass is also good. |
| Power inlet + fuse | $5 | Make sure that the fuse is 250V. IEC320 C14 is a good size |
| Power plug | $7 | 5-15P to IEC320 C13 is good |
| Spade disconnect connectors | $5 | For connecting wires to the power inlet--never solder! |
| Spade terminals | $5 | For connecting wires to and from the PSU |
| Ferrules | $5 | For connecting wires to and from mainboard |
| Ferrule crimper if needed | $20 | For crimping ferrules |
| 12AWG (~3.5mm2) wire | $5 | Two meters is a good safe number |
| Total | ~$155-195 |
The very best PSU brand is Mean Well. They make the most high-quality ones out there. Never buy a knockoff or a sketchy-looking PSU! You could kill yourself. I am not joking. I got mine from DigiKey, mostly since I had high seas (hack club's 2024 fall event) credits and didn't want a sketchy one from AliExpress.
The most popular mainboard out there is the BigTreeTech SKR Mini E3 V3. It's super powerful, small, and has a ton of features. It's fast and has dual Z motor outputs, for only $30.
I didn't do much research on heated beds, as I just bought mine from Kieran in Hack Club. From what I've seen, however, there are two types: the black PCB-looking ones you see on commercial printers and silicone bed plates. Silicone ones are orange and look flexible, while the black ones are hard and have visible traces engraved in them. I don't know much else about these, unfortunately, except that both are attached to an aluminum plate that is attached with screws to its holder.
The build plate is relatively easy. The tried-and-true type is textured PEI-coated, with a sort of grainy appearance. If you don't like that graininess, you might check out glass or dual-sided textured PEI+PEO. The one I bought had textured PEI on one side and PEO on the other. PEO is a smooth, shiny coating usually engraved with reflective designs that imprint onto your parts. For more reading about which build plate is best for you, check this out.
Never solder AC voltage. It's dangerous and unreliable. Instead, use spade disconnect connectors, which grip tightly onto the pins on the back of the power inlet. Before buying, make sure that the pins on your inlet will fit in the connectors. Similarly, spade terminals look like forks and grab onto the screw terminals on your PSU. Again, make sure these fit before buying.
Ferrules, while optional, can be very helpful. I didn't get them due to budget problems, but they are recommended by basically everybody.
But if you cannot use ferrules, never ever tin your wires. Over time and under the stress of the terminals on your mainboard, the solder on the tinned wires will begin to crack and deform. If this continues long enough, the solder can fully come off the wire, the wire can come out, and 24V at 20A directly from your PSU could short on the mainboard. Not only will your 3D printer be ruined, it could easily start an electrical fire. The funny thing about electrical fires is that, unlike regular fires, they can't be put out by simply extinguishing the heat. As long as the wire is shorting, it has more than enough fuel and can generate plenty of heat to just keep burning. The heated bed I got even came with pre-tinned wires. Needless to say, I promptly chopped them off.
This is a great post about tinned wires on a 3D printer (reddit warning lol)
Frame
| Part | Cost | Notes |
|---|---|---|
| Aluminum Extrusions | ~$50 | This price will heavily depend on the size of the printer |
| Aluminum Extrusion connectors | $15 | 3-way connectors are good |
| T-nuts | $15 | M3 size |
| M3 Screws + heated inserts | $10 | Kudos if you get the entire design to only use M3's |
| Heated Bed Spacers | $10 | Whatever method chosen to offset the bed from its holder |
| Total | ~$100 |
The purpose of aluminum extrusions and their connectors is obvious: make the actual frame of the 3D printer. T-nuts are used to connect assorted parts to the extrusions, like linear rails, mounting a screen, or connecting linear rod holders.
You're likely going to need a wide assortment of M3 screw lengths and may need to get M2.5s or even smaller, namely for the printhead or other detailed parts. My CoreXY uses a paraphernalia of M3x8's, M3x22's, countersunk M3's, countersunk M2.5s, and more. For heated inserts, I'd get 4mm length and 5mm outer diameter for M3s, as well as 4mm outer diameter and 4mm length for M2.5s.
Last but not least, the heated bed spacers. Most people will make some sort of heated bed holder that contains plastic, and if the heated bed is too close to the holder, that plastic could deform or even melt. If you're 3D printing your holder, PETG is good at not warping in high temps. You'll want to offset the bed at least 6-ish mm, to provide airflow. I used nylon spacers on the screws between the bed and the holder, which seem to be working well. I know a lot of people use cork and other materials, which would probably be a bit more expensive but well worth it.
Summary
As you can see, this rough BOM is already over $350. The grand total across the outlines is around $550. I must admit, I've been very pessimistic about these prices, and with luck, you should be able to source cheaper ones. However, and I warn you, the Anicept Vex's grand total was around $500, but I was able to get a lot of parts from DigiKey using my High Seas grant, which many people won't have. There's a reason Bambu Labs printers are so expensive, and it's probably not just profit. These machines can get quite expensive.
If you have access to sites like TaoBao or other incredibly cheap Chinese sellers, you'll be more likely to stay relatively within budget.
Well, that's the research! If you have any questions or need help, feel free to post in #highway or DM me (@anicetus) in the slack.
Step Two: Design
Alright! Research is (hopefully) done! Give yourself a pat on the back; you've deserved it. Research is definitely one of the hardest parts of making a 3D printer--in fact it might be the hardest if the design is easy for you--so you should feel relieved.
But it's no secret that design can be very difficult. In my opinion, the printhead and the belt routing are the two hardest parts of any 3D printer design, because they're so intricate and need to be... well, perfect. They both drove me nearly insane, even though I've been working with CAD for a long time now. That being said, here's the order I'd recommend for designing your printer and why:
- Printhead
- So that when designing the gantry, you can leave room for the printhead to move beyond the bed
- A very difficult part, it'll feel good to get it done first
- Usually the part that requires the most research, so you'll be able to see what needs changing as you go
- When beginning, first import all your parts and arrange them. Be very sure to leave room for mounting the belts and for 3D-printed parts
- So that when designing the gantry, you can leave room for the printhead to move beyond the bed
- Gantry
- Import the bed as well to get an idea of the movement you need
- Again, a very difficult part that'll be nice to have finished
- You never want to make the entire frame first and mount all of the electronics, only to begin designing the gantry and find out that your idler mounts won't fit
- This also includes a toolchanger system if you make that
- Always compare your gantry to standard aluminum extrusion lengths (unless you're cutting them yourself) and make it bigger if they don't make extrusions in the size you'd like
- There are two types of gantry homing: switch homing and sensorless homing. This guide assumes sensorless homing.
- I failed to do the gantry 2nd, instead going to straight to literally everything else. I made the frame too big for the gantry (pic below), and I had trouble fitting everything into the space I had allotted for it. This was really dumb, and i hope somebody can learn from it! I certainly did.
- It was when i was designing this that the bad days started. The gantry was probably the hardest thing I've ever made. The idler mounts, the motor mounts, making everything just perfect was infuriating.
- Import the bed as well to get an idea of the movement you need
- Z-axis
- Make your bed holder and belted/tri-motor system before you make the frame, so that you don't make the frame too big or too small for it
- This was where I messed up, big time. I decided that a single motor and a single lead screw would be enough to move a 235x235mm bed. Wrong. Thankfully, I was corrected by some passive-aggressive people in the 3D printing discord before following all the way through with it. But it was heartbreaking to have to redesign the entire Z-axis, particularly since it was actually done! It was an actual nightmare, and I had no idea what to do. Eventually, I settled on a dual-screw belted system, not ideal but the best I could do. I had already designed the electronics, so i didn't leave any room for myself to adjust the z-axis. This was probably the most infuriating part of the entire design.
- Electronics + frame
- Now that the important parts are done, you can mount your PSU and mainboard. Make sure that wires have plenty of room to move around! This was a major mistake I made
- Now that the important parts are done, you can mount your PSU and mainboard. Make sure that wires have plenty of room to move around! This was a major mistake I made
- Everything else
- An MMU, Raspberry Pi mount, etc.
- An MMU, Raspberry Pi mount, etc.
Unfortunately, there's not a lot else I can say technically about design. (Edit: proceeds to write 9 paragraphs about design.) Everybody's printer will be different, and there isn't a standardized gantry type or printhead model. However, this is where you can get clever and make interesting or useful designs. For example, I mounted my PSU and mainboard in a locking mechanism that insured that there wasn't any sag while covering the PSU ports and protecting the mainboard at the same time.
I do have a few tips, however. First, always make sure your belt routing is straight. The line from the motor pulleys to the idlers on the gantry and from the gantry idlers to the printhead (note: the routing from the motor pulleys to the stationary idlers doesn't need to be straight) should be perfectly even, at the risk of having uneven belt tension when moving the gantry and printhead. Besides that, it looks nice and even. Speaking of the idlers, always give them good solid mounts, preferably printed out of PETG. They'll go under a lot of stress, and you really don't want the mount to snap in the middle of a print. This pic shows what mine look like:
This should be obvious, but make sure that your intricate parts can actually be taken apart. Midway through my printhead design, I realized that it was physically impossible to assemble or disassemble it for the simple yet elusive reason that the screws you need to access are only accessible if the printhead is disassembled. This meant that when assembling and when everything was in place, the screws were unreachable and when disassembling they couldn't be seen. This took about a day and a half to fix, a day and a half when I could have been finishing the design. Looking back it's actually quite funny lool
When using spade terminals for your PSU and when using ferrules for your mainboard, ensure that they have plenty of room to stick out. The spade terminals I got stuck out 18mm from the PSU, which I made no account for. Same thing for the power inlet disconnect connectors.
One very important part of the design is the printhead part cooling ducts. There are lots of great guides online for this, and it really is a fine art. It takes forever to get right, and the tiniest change could ruin (or save!) it.
Always make tolerances for parts that touch 3D-printed parts. I'd print a 3D printer tolerance test like this to see how close together you can print parts without them fusing. Your lowest tolerance you get with the test print should be the spacing between a 3D printed part and a non-3D printed part, and the spacing between two parts should be double it.
Designing an entire 3D printer can be extremely difficult, especially for a beginner at CAD. If you don't quite know your way around whichever CAD program you use, I'd recommend going through tutorials so that you're very familiar with functions like lofts, chamfers, and offsetting faces. I definitely learned a lot just by doing, however, and researching just whenever I needed to.
Wire routing can be difficult to get down, as you don't want wires getting stuck in the gantry, caught by the bed, etc. My printhead has this little chute that routes wires straight from the Klicky and the hotend to the Big Bunch Of Wires That Are Zip Tied Together (BBOWTAZTT,) which goes smoothly down to the mainboard and splits off into a rat's nest of red and black wires. It actually works quite well for a $1.50 (zip ties) solution. For a flying gantry, however, I'd recommend getting an actual wire chain.
My lil chute: (printhead mounts right in front of the section analysis)

When i tried a one-screw setup

Big printer, small bed

In the end, however, I'm quite proud of my own design. The printhead is really clean, and in general, it looks more professional than I'd thought it would. One thing though, my motor mounts are pretty unstable. It's not really a big deal when the motors are the ones actually turning, but when moving the belts by hand, you can tell the mounts bend a lot. So just make sure that mounts for stable parts are really really secure and can't bend anywhere.
I learned so much about 3D printers and how they work through the past two steps. I like saying, Point to anything on the printer and I can tell you exactly what it does, how it does it, and why I need it.
Beforehand, I had no idea how CoreXY mechanics work (lol I still dont all the way) but now I can tell you with relative confidence how the mainboard works! With this experience in my belt, I honestly think I could make another CoreXY three times as fast.
Step Three: Assembly
Assembly is by far the easiest part of the 3D printer, but it's also when you'll find anything wrong with your design. You'll need to make a lot of iterations and will feel discouraged. Just know that you can do it. Prepare yourself for making major adjustments and changing things you wish you wouldn't have to.
I wasted quite a bit of filament on stupid stuff, like failing to add any tolerance for the bed holder, not measuring my idlers to make sure they'd fit, (they didn't,) and trying to figure out how the heck I should tension the belts. Not to mention the printhead screws didn't even fit in it ;b
One note: when assembling the heated bed holder, try to get it as level as you possibly can. Klicky probes and BLTouches exist to account for issues in the bed being unlevel, but you really don't want a two-millimeter difference between the front and the back. Having such a large difference can result in prints that, well, are 2mm higher on one end than they should be. Obviously, with a 3D printed holder, it may be hard to get under 1mm of difference, but it's worth a shot.
Speaking of, it might be worth CNC milling an aluminum bed holder. It'll be infinitely more precise than a 3D-printed one, although it will definitely be much more expensive. If you have any leftover budget (lucky) you might want to consider it. Alternatively, you could try using MDF (medium-density fiberboard) sealed with polyester resin.
This was the stage that my parents hated the most. My dad would always walk in, look around for a second or two, take it all in, and ask are you quite done yet?
It looked like a cyclone tore through a mad scientist's lab, with parts and printer guts strewn everywhere. I filled up two big boxes (with the parts that weren't stuck under my bed or cluttering up my desk) with parts to spare. I constantly lost stuff, but it was all part of the adventure!!!1!1!!1


This is the most rewarding part of the printer. Printing out the pieces, and putting them all together, it's like seeing your imagination truly turn into reality. You'll have a printer that you know inside and out, that you know every nook and cranny of. You'll have your own machine, your own design, sitting in front of you, just asking to be turned on. And it'll be fantastic.
please don't fry a mainboard...
But wait, there's more!
Bonus Step: Firmware
Ah, firmware. It's what makes the machine run! From my experience, installing it is a breeze, especially by using KIAUH (the Klipper Installation And Update Helper) on a Raspberry Pi with Klipper. Here's an article about how Klipper works: https://all3dp.com/2/klipper-firmware-3d-printer/
Here's the official guide on installing the firmware, both on the printer and on the Pi. I'd 100% recommend installing via KIAUH. It's quite straightforward and easy, even for those with zero (or less!) software knowledge.
After you're done installing Klipper, you can start tuning your newly powered printer! Here's the best guide in the world. It goes through absolutely everything! It's always so fun to get stuff up and running... to see your baby take its first steps.
You know a guide is good when the author is funny: (ellis's 3dp guide)
The End
Wow! Three steps, a ton of work, and a bucketful of blood, sweat, and tears later, you have a 3D printer. Not only a 3D printer, your 3D printer! Sit back and relax. The struggle is over (for now...) and now you can have fun! It's been a wild journey, and if you're like me, it hasn't been easy. But you made it! Congratulations. Now go watch some Zach Freedman. I know you want to.
~ anicetus